

EDITED: 8/2/2024 (Full disclosure – I stopped using this after a year and converted it to a birdhouse, and got a “real” greenhouse)
If you follow me on Facebook, you know that I am always in groups answering questions about AeroGardens or participating in chats about gardening. Sometimes I end up typing the same thing over and over again. I almost did that today adding comments about what I did to strengthen my greenhouse. I finally realized, “Duh… you have a blog lady. Start turning these Facebook posts into blog posts.” So, you will see more gardening content start to show up on the blog. As previously mentioned, in 2020 while locked down at home, I realized that I really do enjoy gardening. So, it has become a part of what I do. And, this blog is a reflection of me, right? Don’t worry… the tech is not going away! If anything, that will be expanding too. So, this post will be one of many in the gardening realm.
In May 2020, I purchased a cheap greenhouse on Amazon just to house the few plants that I thought I would have (HA!). I spread out well beyond the greenhouse, but I still used it for a lot of my plants. One thing I learned even before assembling it, was that if you just set up one of these and leave it and expect it to be there after a windy day or a storm… it won’t! I have seen a few posts from friends saying that their greenhouse fell over or blew away. Also, if you live in a climate like mine that gets real winter, it will take a beating.
So, here are my 5 tips for beefing up your cheap Amazon, Aldi, or Walmart purchased greenhouse from the start so it will last throughout your growing season and beyond.
These polyethylene greenhouses are a popular option because they are very reasonable, great starter greenhouses. However, if you don’t do a few things to strengthen your little greenhouse, it will not last long.
Supplies Needed
(The below contains affiliate links)
- A Greenhouse – https://amzn.to/3q2rbLA
- U Stakes – https://amzn.to/3pZEqwu
- Zip Ties – https://amzn.to/39UVZIu
- Mulch*
- Bricks*
- One 6 ft piece of landscaping trim
**Just pick up the mulch, bricks, and trim at your local Home Depot, Lowes, or Menards.
How to Strengthen a “Cheap” Greenhouse
Assemble Correctly
This should be obvious, but it’s easy to not push all of the poles securely into the connectors or to inadvertently loosen one while moving the greenhouse. So, once you move it into place, just be sure to double-check that all connectors are secure.
Anchor The Greenhouse to the Ground
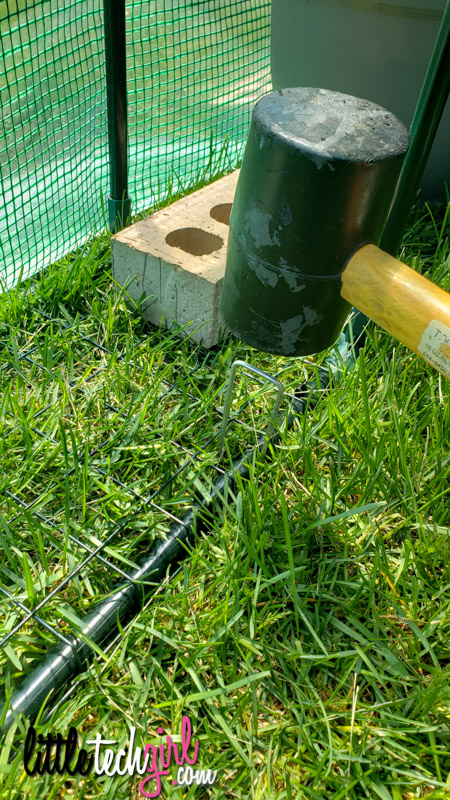
My greenhouse came with little simple spikes or tent spikes for the purposes of securing the cover to the ground.
These are nowhere near strong enough to hold the greenhouse together during strong winds. If sitting your greenhouse on grass or dirt, instead, pick up some of these heavy-duty landscape staples aka U Stakes.

They are the perfect size to wrap around the poles of the greenhouse. Use a mallet to pound them securely to the ground. I probably used a total of 15 or so all around the bottom.
If you are setting it up over concrete or wood, you should still anchor it. However, I have not done that, so no advice!

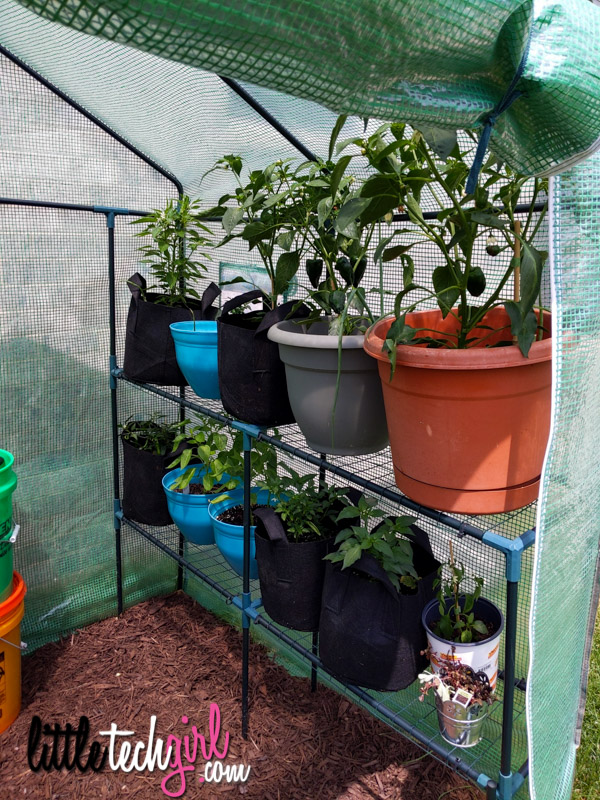
Zip Tie the Shelves
Strangely… all of the greenhouses like this don’t seem to come with a way to secure the shelves to the poles. They just sit on top. I just knew that I was going to bump one and knock it off. So, I purchased a pack of zip ties and got to work attaching the shelves to the poles. Attach them in the front and back. This way they are not going anywhere!

Add a Floor
I put my greenhouse together over grass. I did not want it to end up a mud pit, nor did I want to have to keep trimming grass every couple of weeks. I picked up a few bags of mulch (I think I used 4) and created a floor. First, I lined the bottom with cardboard from boxes and covered it in a nice thick layer of mulch. I also bought one 6 ft strip of landscaping trim, and put that across the bottom of the doorway to hold the mulch inside. I was only using the bottom rack for storage anyway, not plants, so I covered that too.
Use Bricks Around the Perimeter
Use bricks around the perimeter of the cover to hold it down, and keep critters from wiggling under. I also put a couple of bricks on the bottom of the door when I zip it up at night. This keeps the wind from sneaking under and causing it to unzip and flap in the breeze.

BONUS TIP: Remove the cover in winter and store it so the plastic does not become brittle, or get destroyed by a heavy snow storm.
These are all things that I did to my little greenhouse last year to help it survive. It did stand up through a Chicago winter full of wind and snow. However, it did notice some damage. So, now I advise not leaving the cover on through winter.
I hope this helps someone strengthen their small (or larger similar) greenhouse and keep it from blowing over into the neighbor’s yard. Happy gardening!
Just ordered a greenhouse from Amazon. It’s supposed to be a CB heavy duty one, but I will certainly use your tips.
Any suggestions on how to beef up/strengthen the wire shelves? I have 2 of the greenhouses you show in the post (or at least very similar ones from Amazon). The shelves say they can hold 22lbs but that is definitely not true. I’ve add extra metal rods under the shelves & have zip tied everything (shelves, connectors to shelves & frame etc) but the shelves are still sagging & the little plastic connectors are bending & have stress points. I have even used bungee cords to ensure the greenhouse sides don’t pull away from each other. This is with just 10 pounds on the shelf. Any suggestions would be greatly appreciated!
Hi Rebecca!
I’m sorry that I am just seeding this. I was traveling. I do agree that they feel flimsy. I did not have any trouble with them holding my pots. But, you could try laying a thin piece of wood on top. I actually do not use this greenhouse anymore. I upgraded to a “real” greenhouse. But, I still have the frame and it is still going strong being used as a bird house!
Good luck!
Thank you very much! I just got mine and will be doing what you did . I will let you know how I goes ( Surrey uk )
I just purchased this same one. Thank you for the tips!! Do you take the plastic off in the winter? Or when a big storm is coming?
Hi Diane,
I did not take the cover off in winter, so this one did not last long. You should definitely remove the cover! I have since upgraded to a “real” greenhouse. 🙂 But, the frame from this one is still going strong so I converted it to a bird feeder hangout!
Thanks for this! I was so excited to find a small greenhouse at aldi last summer, but I’m really nervous about the wind and I haven’t set it up yet(I live in Oklahoma).
I live in Oklahoma as well. I have one that came from Aldi. I currently have it without the cover on my patio. I’m wondering if once the cover is on- I’m wondering if it will be warm enough to keep a few plants in over winter.
Hi Robin,
I’m actually in the Chicago area. But, as to your question… no. These little greenhouses hold in no actual heat if it is really cold. People who use greenhouses over winter heat them in some way. I upgraded to a “real” greenhouse, but I still do not use it in winter. It is just too cold out.
NICE POST!
THANK YOU FOR SHARING….